


We can develop children's visual awareness just as we can develop their ability to read and write, says Nigel Meager...
So much of what we learn is bound up with what we perceive. In many ways our sensory perception provides the raw material for learning. Art and design is a subject that naturally focuses – sometimes in a self-reflective way – on what is seen. After all, being able to see the world delights us and informs us; it moves us and enriches our lives. The visual world and our perception of it are fundamental to how we think, act and feel. This has to be central to learning.
In general terms, it might be thought surprising that more classroom time is not devoted to teaching aimed at developing a visually aware child. We can help children to understand how they see the world just as we help them to learn how to read and write. Bit by bit, the richness of the visual world is opened up – as is the huge variety in the ways we interpret it.
There are simple, practical strategies for the effective development of children’s visual awareness in each year group from Reception. The visually perceptive child has more to talk about, write about, record, contrast and compare. There is just so much more to be seen and so much more to be excited about!
 When we focus on how we see differences in the building blocks that make up the visual world, we can choose to break down our visual perception in terms of shape, pattern, colour, form, space, tone, texture and line. These visual, tactile and spatial elements (they have also been called formal elements, visual qualities or visual concepts) have historically provided an important scaffold for art education – we can still find references to them in the National Curriculum documents today.
Whatever happens in terms of future revisions of the National Curriculum, the visual elements will always be an essential component of good art teaching. Art educators have sometimes thought of them as constituting a visual language of art and design. One benefit is that the teacher can use these visual elements to break down the development of visual awareness into easy-to-manage and practical structures. This helps planning and gives secure objectives for art and design sessions in school. Visual elements can be used to focus children on the appearance of an object, a landscape or a person, which helps children know what to look for when they are drawing. Children will also begin to recognise these same qualities in any art, design or craft object they discover and talk about. They will see that artists, craft workers and designers manipulate these visual elements as they work, and children will learn to manipulate them in similar ways as they experiment with new materials and techniques. Understanding about art and design is enhanced.
What follows is one example of a teaching strategy in action. It is helpful to think of this activity as a warm-up exercise. It is designed to open children’s visual thinking rather than to produce a finished art work. Experimenting and talking are central to the activity. Children and teachers will need to be creative risk-takers, but also to think of themselves as collaborators as the teaching and learning narrative unfolds.
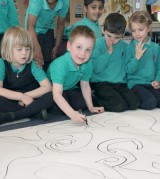 This sequence of activities should help children collect different outline shapes by looking and drawing. The teacher is talking to Y1 children.
“I want to find out the shape of the large window in the classroom. What problems might I come across? Can I put the window on my paper and draw around it? Why not?
“Look. If I close one eye and point at the window, I can trace around the outside of the frame to draw the shape of the window in the air with my finger. Let’s all practise carefully.
“Now here is a black wax crayon. I can look at the window and instead of tracing around the frame with my finger in the air, I can draw the shape with the crayon on the paper. This time I am using a crayon, not my finger, and I am drawing on the paper, not in the air. I have to look carefully at the shape of the window.
“Look at the shape I have drawn. Now you can collect the shapes of anything you want. Just look carefully and trace around the shape in the air with your finger and then draw the outline on the paper. Let’s try and draw the shape of this electric fan together. Tell me some of the other things in the room you could find outline shapes for.
“Now you can hunt around the classroom and collect different outlines by looking and drawing. See how many you can collect. Don’t draw too much detail inside your shape. It’s the outline that’s important.”
The children could collect shapes of things that are much bigger than they are, or theycould collect shapes of things from outside, as well as inside. The children should look carefully but at the same time not worry about making mistakes. The important thing is that they are looking at and drawing shapes. They should be making collections of outline shapes without adding too much detail. If they make attractive drawings, that is a bonus. Soon they won’t need to trace the shapes with their fingers, they will just look and draw. Children could use clipboards or A3 drawing boards. Handwriting pens make good clear lines and no one in the class can rub out the lines. But, any media which make strong clear lines will be fine. Avoid HB pencils! The most important thing is that children are mobile and able to move around the classroom or outside to draw the outline shapes.
Now the teacher addresses the class again.
“Who found an outline shape of something very large in the room or something very small? Who found an outline shape with straight lines or with curves? Who found an outline shape with bumps or points? Did anyone find an unusual shape? How would you describe it?”
Now children will be very focused on the visual quality of shape, they will have discovered there is an amazing variety of shapes and have practised drawing these themselves. One follow up activity, which is great fun, is to ask children to invent their own shapes. The only criteria are that a line must end up where it started to enclose a space and create the shape.
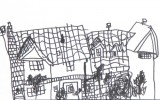
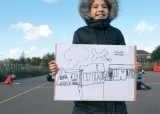
This warm-up activity will help children go on to make observational drawings. A teacher working with any year group can use the idea of shape to help focus children and encourage them to draw what they see, rather than what they think they see. For example, you might help children to draw buildings by suggesting they start by drawing one shape they can see (perhaps a window or a door). They should draw this on the centre of their paper. Tell them not to draw the whole outline of the building first but to go on adding allthe shapes they can see in the building. Gradually their drawings will spread across the paper. They will eventually be drawing larger outlines and you can suggest they can fi ish their drawings by adding all the details in and around the buildings.
The warm up activity is very important. Children will be working in a defined structure and yet will feel creative control over the shapes they are collecting, and even more so if they are able to invent shapes as a follow up. With older children, it is particularly tempting to ignore these preliminary activities or rush through them. In particular, it is so important to encourage children to explore and talk about shapes, which are so different from the shapes they know about in maths. The focus on this element of visual perception will help them make much better drawings and help those who feel they are not good at drawing by offering a supportive structure which is not focused on an end product. Try this approach with all groups, right up to Y6. You will find that children are able to talk about how buildings look with greater clarity and insight. They will have noticed so much more as a result of this activity. They will have more to compare and contrast – try comparing two different places of worship, for example. Plus, they will have much more to write about.
Nigel Meager wrote two books for the National Society in Art and Design in the mid 1990s. These were Teaching Art at Key Stage 1 and Teaching Art at Key Stage 2. They are now being published again in updated editions by HarperCollins under their Belair imprint. The books will now be called Teaching Art 4–7, which is due for publication in April 2012, and Teaching Art 7–11, which will be available in the autumn of 2012. Apart from teaching a Year 2/3 class during 2010/11 at Dussindale Primary School, Nigel also worked across the whole of KS1 in the school supporting colleagues and teaching all the projects which will appear in Teaching Art 4–7.
Here is another warm-up activity with line. Start off by showing the children how easy it is to draw a line. Talk about all the possibilities with children. They will make lines that are wavy, zigzag, straight, curling, etc. The children are now going to make their own lines.
“Let’s experiment. You are all going to make lots of different lines. I will call out a few to start with. Make a long bumpy line. Make a short spiky line. Now experiment and make some lines of your own. You can put your lines anywhere on the paper.”
It is helpful to link the idea of line with the idea of movement. Ideally you should do this in the playground or the school hall. Ask the children to think up different ways of moving from one point in the hall to another. Children will run, hop, somersault, roll on their sides, shuffle, walk in slow motion, skip, leapfrog. They will have lots of ideas of their own. Give the children some large paper and ask them to invent lines that to go with the movements.
Try other warm up activities by asking children to explore patterns, textures or colours. Quality of end products will be improved by allowing children to explore and experiment. Children will all also gain confidence as they work in an independent way with out too much adult prescription.
Nigel is a freelance art educator focusing on CPD training. He also teaches Art and Design and Design Technology on the PGCE course at the University of East Anglia. You can contact Nigel by email (.(JavaScript must be enabled to view this email address)).


Power Maths – A Child-Centred, ‘Can-Do’ Mastery Teaching Programme for KS1 and KS2
Category: Maths

Fit To Dance Schools From Disney On Ice
Category: Other

‘S!ng Sensational’ And ‘A King Is Born’ – Two Fun New Musical Masterpieces That Children Will Love
Category: Music

Product review: Schofield & Sims Fractions, Decimals & Percentages
Category: Maths

Use scaffolding to wean children off high levels of TA support
Ace-Kitchen-Manager

Behaviour management: choosing the right words
Behaviour Management

Teaching five year olds to talk
Ace-Classroom-Support


