Mike Askew's challenge to build an ancient fortress will stretch children's geometric know-how...
This lesson, or group of lessons, is built around a series of challenges that require children to visualise and describe 3D shapes, and make precise use of geometrical language. The challenges are set up as group activities that do not need much initial teacher input. However, after each activity it’s a good idea to have a discussion with the children about how well they thought they worked in pairs and groups, and what they might do differently to help them work better together.
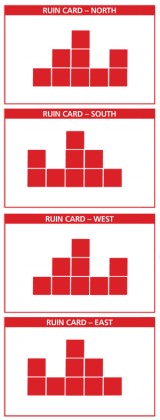
The main preparation is collecting together sufficient interlocking cubes (e.g. Multilink cubes) for as many groups to work on the tasks together as you choose. There needs to be at least 10 cubes per pupil, so I make sure I have around 300 if I want the whole class to be working simultaneously on the challenges. I also collect opaque carrier bags or large used envelopes (big enough to contain a shape made out of six cubes) – one for each child. Finally, I need to prepare sets of the ‘Ruin cards’ (see right) – one set of four for each group of four children.
I briefly discuss with the class that they are going to be working on a number of challenges that involve building 3D shapes.
“You are going to be working in pairs initially and then in larger groups. One of the things I want you to think about is what you do that makes the paired or group work go well and how you can make sure you do more of those things.”
 Each child has an envelope (or bag). They take six to eight interlocking cubes and fit these together to create a solid shape that they put in the envelope. They swap their envelope and its contents with someone else on another table.
In pairs the children take it in turns to be ‘describer’ and ‘builder’. The ‘describer’ has the envelope. They are only allowed to feel the shape inside the envelope; they must not take it out to look at it. Their challenge is to give instructions so that the ‘builder’ can construct a shape that matches the one in the envelope when it is finally taken out to compare.
Ask:
• “What were particularly good instructions that your partner gave you?”
• “Were there any instructions that were not clear? How could they have been made clearer?”
• “What might be the best piece of information to give your partner right at the beginning?”
This works best for groups of four to six children. Each child takes three interlocking cubes, and they put these together to all make the same initial shape. It is important that they compare and check each other’s starting shapes to make sure that they all match.
They hold their shapes under the table. Going round the table the children take it in turns to add one more cube to their shape (keeping it under the table). They describe to the rest of the group what they are doing and everyone tries to add a cube to their own shape in the same place, again keeping everything under the table.
The group members can ask the person describing to clarify the instructions, but they cannot take their shapes out from under the table until everyone has had a turn at adding a cube and describing the action. They should then compare their final structures: have they all ended up with the same shape?
They repeat the challenge with a different person starting off.
Ask:
• “Did this get easier as you did it more often?”
• “What were some particularly good words that people used?”
• “Were you good at asking questions to make sure you understood?”
In groups of four, the children should organise themselves to sit around a four-sided table, nominating one person’s side as north’. From there they can label themselves east, south and west appropriately.
“Your challenge as a group is to recreate a model of an ancient fortress that is now in ruins. Each of you will be given a card showing what the castle would have looked like from the position that you are sitting in. Using the information on your card, and working as a group, use the cubes to make a model of the fortress.”
I stress that each member of the group can describe what is on their card but cannot show it to the other group members.
“Okay, before you show each other your cards, check once more that when you get down so that your eyes are level with the model what you see really does correspond with what is on your card.”
 Before introducing the final challenge I put the diagram shown in figure 1 on the board. I explain that this is a ‘bird’s eye view’ of five cubes and ask the children to sketch what they would see if they looked at the cubes side on from the directions of the arrows.
We discuss and agree that the view would be similar from each direction and both diagrams would be the same.
 I then put this bird’s eye view up (figure 2) and ask them again to draw the views from each of the two directions.
I find it usually takes a fair bit of discussion before the children are convinced that the same two diagrams represent the three-cube arrangement and the fivecube arrangement. We talk about how the ‘flat’ views cannot distinguish between cubes being in a straight line or being ‘staggered’.
“Go back to the model of the fortress that you built. Can you remove any cubes without making the four views that you have inaccurate? What is the smallest number of cubes needed to build the fortress?”
When the group has decided that they cannot remove any more cubes from their model, I ask them to draw a bird’s eye view of the model.
“How are you going to show where there are cubes on top of each other?”
As a class we look at and discuss the different bird’s eye views, whether each matches with the N, S, E, W views and how many cubes are involved.

Mike Askew is professor of mathematics education at King’s College London and a freelance primary maths consultant. For further information on his work visit http://www.mikeaskew.net
